Thursday, January 5, 2017

Mistcloak Tutorial

Every girl needs a good cape, right? Sure, they're not always practical for everyday wear (scratch that, they're almost never practical for everyday wear), but you never know what might happen. Yes, fair enough, I already have a cape (plus a couple capelets, which are rather more practical), but I've wanted to make a Mistcloak more or less since I discovered the series. And, as you already know if you were paying attention last October, now I have!
We Mistborn are incredibly mysterious. Also dramatic.

 Putting the cloak together wasn't that hard, just time-consuming. That said, you can probably do this in a day, if you don't start too late and don't take long breaks and don't have to take pictures every step.

Now, let's get started.


Step 1: Gather your materials.
You're going to need:
-3 yards of grey felt. You can use other materials, depending on what you want your cloak to look like, but felt has a few significant advantages. It's relatively inexpensive, it's not too heavy (though it's surprisingly warm), it has a nice bit of visual texture that I think looks fairly mist-like, and, most importantly, you don't have to hem it to keep it from unraveling. 
-Grey thread. Which I think should be pretty obvious. But a list of two items looks rather awkward, so . . .
-One or two closures. I used two frog closures, which worked pretty well and looked awesome, but which were a pain and a half to sew on. I also considered using loop-and-toggle closures, and you might be able to get away with just one of those. 

Step 2: Make the Capelet
The Mistcloak is made up of three parts: the hood, the capelet, and the strips or tassels. This isn't the absolute easiest way to do it, but it is the most cost-effective. The first part you're going to make is the capelet. I used this pattern from Urban Threads as a guide/confirmation that my plans weren't going to end in disaster. (They weren't.) 
First, measure the distance from the base of your neck to the place you want the cape to fall, then add four inches. After that, fold your material into quarters so you have four layers, then use a measuring tape or ruler and a fabric pencil to trace a quarter-circle. (Sidenote here: for purposes of making this part, it might be useful to divide your three-yard fabric purchase into one piece that's one yard long and another piece that's two yards long. The one-yard piece will give you your capelet and  your hood as well, while most of the rest goes to making your tassels.)
The fabric pencil wasn't that bright originally; I've marked over it in Photoshop so you can see what I mean. I ended up making my circle about 20 inches in radius, and I think I could've gone a little shorter, but as it is it hits right around my elbows, which isn't bad. You'll need to do the same thing at the four-inch mark to make the neck-hole.

Once you have your lines, just cut along them . . .

And, boom! You have a circle of fabric which only needs a bit of hemming to become a proper capelet!
As a note: the Urban Threads tutorial suggests cutting a wedge out of your cape before you unfold it so it's not a full circle and is therefore less bulky. I chose not to do this, but I also ended up with a lot of cape, so whether or not you cut down the capelet is up to you. If you do, you'll need to follow a few extra steps from the Urban Threads tutorial to put the capelet together before you move on with my tutorial. Go ahead, I'll wait.

Done? Awesome. Our last step in making the capelet is to hem it, which should be pretty self-explanatory. A single fold-over will work fine.
I recommend turning up the outside and neck-hole before you do the front edges. It'll make life just a touch easier. And that's it- time to move on to the next part of the cape!

Step 3: Cut the strips (tassels). 
Aka the most tedious part of the project. You'll get bored. Your hand will get tired. You'll start to feel like you're going to be doing this forever. But it'll be worth it in the end. Just wanted to let you know up front.

Anyway. Grab your tape measure again and measure from where your capelet hits to where you want your cloak to end- about ankle-length is good. Add an inch or two. This is how long you want to make your strips of fabric. Now grab your fabric pencil and start marking out your strips. Don't worry about getting exact length or width; a little variety adds visual interest, and you can always trim length later. 
I made some of my tassels two inches wide and some an inch and a half. I wouldn't go under an inch and a half wide, but you could go up to two and a half or possibly even three inches in width without a problem.

I suggest alternating between marking and cutting strips; it'll give your hand a break. Also, you can generally cut strips and watch TV (or YouTube, if you put it full screen) at the same time, unless you're a really bad multitasker. Unless you have an extraordinary amount of patience, I suggest making use of that ability.

Step 4: Pin the strips.
Once you have a nice pile of felt strips, but before you've used up anywhere near all your fabric, stop cutting.
You don't have enough strips yet, even if you think you do (I thought I did, and then spent another hour or two cutting), but that doesn't matter- you need a break, and you need to know just how many more you need. So, let's start pinning!

Try to overlap your strips a bit. How much is up to you and depends on what you think looks good and how much time you want to spend cutting out more of these. The tops of the strips, for the record, should be just a touch above the edge of your capelet hem. Once you've pinned all the strips you've cut, go cut more and then pin those. Repeat until your cape is completely encircled.

At this point, your roommate (or whoever happens to be in the area) may accuse your cloak of looking like a massive grey jellyfish. Ignore them (even if they are technically right). It'll look much less jellyfish-like when you're done.

Step 5: Sew it all together
I said that cutting the strips is the most tedious- but this can be the hardest bit, just because there's so much material and so many pins. Try to keep your line of thread fairly close to the line from when you hemmed the capelet- but if you can't, that's fine; as long as your thread is fairly close in shade to your fabric, no one will notice or care. Just make sure all the strips are attached and you're good to go.

Also, if you can manage to complete both this and the previous step without getting pin-pricked so many times that you wonder if Ruin's trying to get a spike into you, congratulations. You're better at this business than I am. 

Step 6: Make the hood
This step is actually optional; you don't have to add a hood if you don't want to. However, it's not hard to make, and I think it's worth it, because hoods are awesome. "Faces shrouded in shadow" and all that.
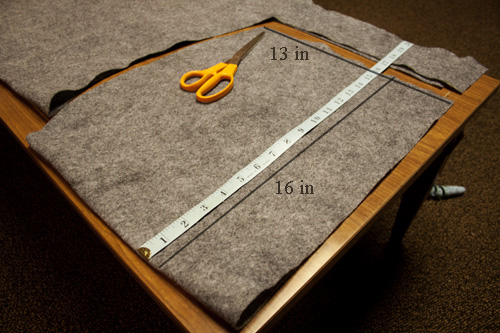
Assuming you decide to add a hood and don't just skip to the next step: get the piece of fabric that you used for the capelet and fold what's left in half. Then mark out the hood. I based my measurements on this cloak, if you want to customize your hood for yourself, but I made mine 16 inches on the long side and 13 inches on the short side.
As you can see, I also added a curve to the back of the hood to give it some shape. Once your piece is cut out, turn the front edge over twice, like so:

(You can do just once, if you prefer, but doing a twice-turned hem adds a little support to the front of the hood, which is nice.) Sew the hem. Then, pin the back of the hood and sew that. Seam allowance is a bit more important here; try to keep about a quarter of an inch from the edge. You may want to trim this allowance after you've sewn it, but not before.

Once the hood itself is done, you can attach it to the rest of the cloak. Fold the cloak in half, inside-out, so you can find the back middle point of the neckhole. Line up the rear seam of your also-inside-out hood with that and pin in place. Then open up your cloak and pin the rest of the hood along the neckline like so:

Notice that the hood doesn't go all the way around the neckline. Try to keep the amount of cloak not attached to the hood equal on both sides. Measuring is good- I eyeballed it and it turned out ok, but it did make putting on the fasteners a touch awkward. Once you've gotten the hood pinned well, return to the sewing machine for the last time to attach it. Only one step left now!

Step 7: Attach the fastenings and make final length adjustments.
Whatever type of fastening you chose should have instructions on the package, and where on the opening of the cloak you put them is- once again- up to you. I put one of my cloak an inch or so beneath the edge of the neckline, and the other a little more than halfway down.

Also, a word of warning if you use this type of frog closure:
See how the piece on the right is at a different angle than the one on the left? You do? Good. Whatever you do, don't let that happen. Both halves of the closure need to be at roughly the same angle; otherwise the whole thing will be immensely annoying. Trust me.

Now is also the time to make sure you're ok with the length of your tassels. Word of advice: if they're touching the ground, they're too long. As I said earlier, you want them about ankle length at the longest.

And now . . . your Mistcloak is complete!
There's always another secret.
 For those curious: once the Mistcloak was done, the rest of my costume wasn't terribly difficult; I already had almost everything.
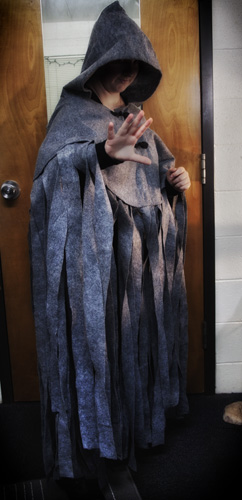
The lady of the mists. Fear me.
Underneath the cloak, I wore a basic black shirt and maxi skirt- no, a skirt wouldn't be especially practical for fighting in, but I didn't have black jeans- along with black boots, and borrowed a black belt from my roommate. The coin purse I made with scraps left over from the cape; it's just a small piece of fabric folded over and sewn with a bit of a curve to the bottom to form a bag, with some yarn threaded through slits at the top and then attached to my belt as a drawstring. The necklace, of course, I already had from when I made my Mistborn metals vials.
I am totally shooting coins at you right now and not just doing a vaguely action-ish pose in front of the camera. Totally.
The bracers I made using this pattern from Epbot. They actually use fun foam, with patterns drawn in silver Sharpie, though they look leather-ish; click the link to find out how. And then do yourself a favor and start following Epbot, because Jen is awesome and geeky-fangirl-ish and fun and posts semi-frequent how-tos on various geeky and cosplay crafts. 

What do you think of my Mistcloak? Do you have any questions? Any suggestions on how you might've done it differently?
Thanks for stopping by!
 -Sarah (Leilani Sunblade) 

18 comments:

  1. Cool post! Looks like a really fun project,and I like your results. :D

    ReplyDelete
  2. Ooh, it's SO EPIC, Sarah! I love it - and maybe I'll have to try my hand at it sometime ;). Thanks for sharing!

    ~ Savannah
    scattered-scribblings.blogspot.com

    ReplyDelete
    Replies
    1. Definitely do! I'm glad you liked it! And thank you for reading!

      Delete
  3. Girl, you're so crafty you should be a Slytherin! XD

    ReplyDelete
  4. I'm not the best at sewing (read: I don't sew. Ever.), but this makes me want to give sewing a try. (though I probably won't because I would mostly likely end up screaming with frustration.)

    But the PHOTO SHOOT POSSIBILITIES WITH THIS THOUGH. o.o It looks so epic and it makes me incredibly happy. :D

    katie grace
    a writer's faith

    ReplyDelete
    Replies
    1. Mmm . . . it wouldn't be the WORST first project in the world . . . but it also wouldn't be the best. BUT YES, PHOTOSHOOTS ARE AWESOME. Even when all you're doing is setting the self-timer on the camera and then running to try to get in position before it goes off. Actually having another person to do it with would be even better.

      Thanks for stopping by!

      Delete
  5. THIS IS ABSOLUTELY FABULOUS!! I've always wanted a cloak.😍 Or a cape. Because, you know, #fabulous reasons. Did you ever read Ranger's Apprentice by any chance? I was always obsessed with having a Ranger cloak in my small youth but I never got there haha.😂 Anyway the cloak looks so good!! You're amazing!

    ReplyDelete
    Replies
    1. THANK YOU! And yes, I did read Ranger's Apprentice, and I want to make a Ranger cloak sometime, but I'd have to find the right fabric for that (or else learn to dye fabric) and so that's a ways off.

      Delete
  6. This was the first post I saw when I clicked your blog link, and I told myself: Ok. I love this blog. :D Fabulous post! Everyone needs a good cloak, and there are so many awesome costume ideas I could come up with from this tutorial. In other words, I'm definitely trying this sometime. Epic job!

    ReplyDelete
    Replies
    1. Thank you very much! And everyone does indeed need a good cloak. Or two. Or three. Best of luck with your endeavors, and thanks for stopping by!

      Delete
  7. Hi Sarah, I'm planning on making my own mistcloak and this tutorial is super helpful. Do you think velvet instead of felt is a good fabric choice? Otherwise, what fabric would you reccommend? Thanks!

    ReplyDelete
    Replies
    1. Ok, so this is ages late (I'm sorry about that), but for future reference of anyone else reading this: I picked felt because it's cheap, doesn't require hemming (sure, I did hem a lot of the edges, but I didn't necessarily need to), and had a nice bit of color variation that fit well with what I wanted. That said, if you want to try making it in velvet, go ahead! Just keep in mind that it'll probably be heavier than mine and it might involve more hemming.

      Delete
  8. I don't normally comment on things like this, but I just have to say thanks for this!
    I managed to make my own mistcloak by following this (and a few more guides, since I actually haven't sewn in my entire life haha) and I think it has ended up decent enough, for a first go anyhow!

    ReplyDelete
    Replies
    1. You're welcome! I'm glad that my tutorial was helpful and that you were able to make a cool Mistcloak too!

      Delete
  9. Hi! Im only about 5'3. Will i need any less felt?

    ReplyDelete
    Replies
    1. Depends how long you want your Mistcloak tassels to be! I recommend figuring out how much fabric you'll need for the capelet (based on where you want it to hit on your arms/chest), then measuring the length from where the end of your capelet will be to where you want the bottom of the cloak will be. Add a little bit of length (remember, too much fabric is an easier problem to solve than not enough!), and use that to determine how much fabric you need. Depending on your measurements, you might be ok with 2.5 or even 2.25 yards, but I wouldn't want to go too much less than that.

      Delete

I'd love to hear your thoughts! But remember: it pays to be polite to dragons.